Sculpting greenstuff cloaks takes patience and a little bit of know how. In this post, I'm going to show you how I make regular full length cloaks. I'd planned on adding fur pelts to this post, but it was getting far too big for one post. This post covers fur.
What you're going to need (for both types of cloaks)
A good amount of greenstuff
Cooking oil or other suitable non-sticky greenstuff working agent
Your sculpting tools and X-Acto knife
Color Shapers (optional, but very helpful)
Plasticard and some cardstock (index cards work great)
BluStuff (this is for molding the additional fur pelts)
The color shapers are for sculpting and allow you to get smooth textures to your greenstuff. I use them for the smaller folds in cloth. They aren't required, but are very helpful. If all you have is the regular GW sculpting tool, you can still do this.
The BluStuff is another optional tool for the fur pelts. The idea is to sculpt your fur once and then use a mold of it to make additional fur pelts afterwards. This is much easier than trying to make them each time on the irregular surfaces of a model.
Where to start for cloaks
This tutorial looks at making the full length cloaks. If you're looking for a half tabard or something smaller, you could always try and scale this down or I have another tutorial for sculpting those here. It's a different process since it's a much smaller area you're working in when it comes to front half tabards.

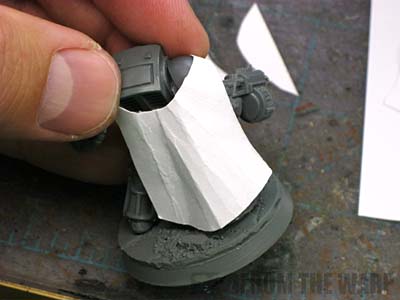
The first thing you want to do is get a template of your cloak. Here is where the cardstock comes into play. Imagine how you want the cloak to sit on the model and cut out a rough shape. Keep refining the cardstock shape until it fits over the model in the shape you want it to.
It won't have all the folds in it right now and that's ok, we just want to know the basic shape we need for our greenstuff.
Getting the greenstuff ready to sculpt
Here's where you need a flat, smooth surface to work on and your release agent. It's almost as if you're rolling out dough. You need to end up with a piece of greenstuff that is flat, big enough that you can cut your cardstock template from it and consistent in its thickness. I work over a spare piece of plasticard since I know it's nice and smooth. I use the handle of my X-Acto blade like a rolling pin.
The key is to make sure you flip the greenstuff as you keep rolling it out. As you do that, make sure you have a light coat of oil on the plasticard each time... you don't want the greenstuff to stick at all to your flat surface. This is important.
I will lay out a ball of greenstuff and then keep flipping and rolling it out until I have it big enough to cut my shape from and it's roughly the same thickness all the way across. Once you have this flattened out, let it sit for 30-40 minutes (assuming a 50/50 mix of yellow/blue). Make sure you don't have any air bubbles trapped underneath your greenstuff either, those will create surface texture you don't want.
The reason you let it sit is so that you can handle it without it completely falling apart in your hands or ending up with a hundred finger prints all over it. Even letting it cure this long will require you to be very careful in handling it. Giving it about 45 minutes is enough I've found for it to begine to cure and it won't completely stretch out of shape as you begin to work with it. Remember, the thinner it is, the harder it will be to work with. You want some thickness to it so it retains its shape and folds. Too thin and you won't be able to "shape" it.
Cutting out your cloak
Once you've waited long enough, set your cardstock template on top of your greenstuff. Lay it on there gently as you don't want it to stick. Mark about where the edges are and then remove it. Now take your X-Acto blade and slowly and carefully cut out the shape from your greenstuff. It doesn't have to be absolutely perfect, but you want it fairly close.
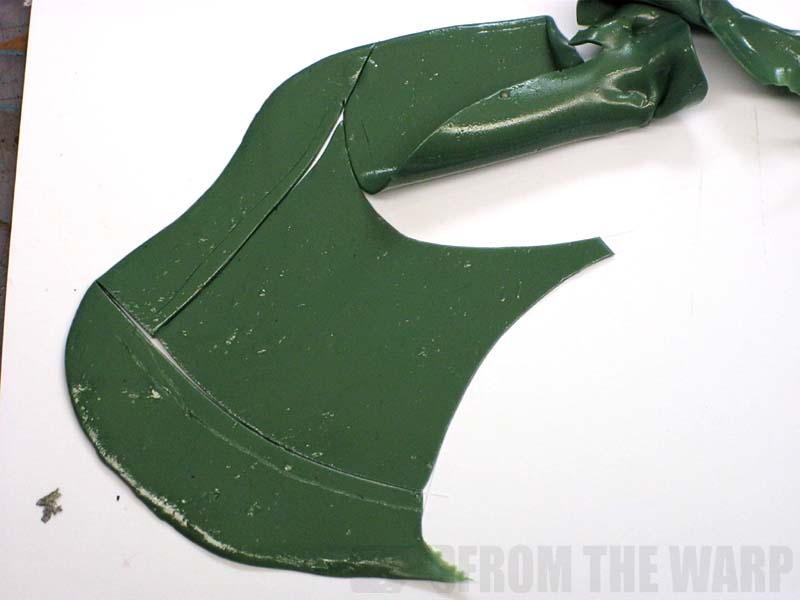
When you're cutting, don't pull your blade since doing so will pull the greenstuff and create small ripples on the surface. Use more of a steady chopping motion and always keep your blade wet to reduce any sticking and pulling. The idea is to cut it out without deforming the shape of your greenstuff cloak.

Setting your cloak in place
Carefully peel up your greenstuff and position it on your model. There will be some natural folds that develop as you do this and here is where you can start creating your own folds by pushing and pulling on the greenstuff until it's in the shape you want. Take your time here. I use the back end of a paintbrush since it's smaller than my fat finger. Once you have your cloak in place, you can use your color shaper or sculpting tool to add smaller folds at connection points and places where the fabric would bind up and collect.
Letting the cloak cure in place
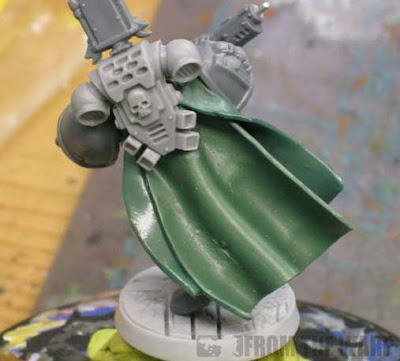
Once I have my smaller folds sculpted in and my cloak about how I want it to look, it's time to set it down to finish curing. I have a small spray paint cap with some poster tac on top of it that I use to position the model so the cloak hangs straight down (due to gravity) I'll set the model at the correct angle so the cloak hangs there without lying against the model and slowly picking up the shape of the model underneath it.
I also sit there and periodically check on it to make sure the folds I put into in aren't coming undone slowly. If they are, I'll push them back into position.

Some final thoughts and things to consider
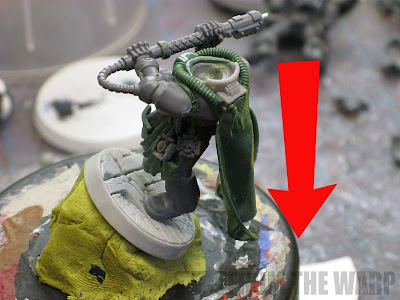
On this model, there are a few things I want to point out. The first is that I did not put too much work into the top of the cloak. The reason for that is it's going to be covered up with fur later on this week. Since I'm doing that, I don't need to make sure the detail is perfect.
The second thing is the small area on the surface of the cloak with a few surface imperfections. Those are air bubbles that were trapped in the greenstuff while I was rolling it out. There are a couple ways to fix them. You can shave or sand them away before you attach the cloak to your model. If you have any dimples or cavities, they can be filled in with a little bit of liquid greenstuff.
Just fill the void, let it cure and then take a damp Q-Tip and gently rub away the excess liquid greenstuff until you have the area smooth.

An alternative method if you want really well defined folds
This method is similar to the half tabard method, only scaled up to this size. It can be a bit tricky to do since it requires such smooth sculpting to pull off. This takes considerably longer to do as a cloak will have to be done in a number of sculpting sessions and not in one pass.

This is exactly how you do the smaller half tabards, only much bigger.
Worth remembering when it comes to greenstuff cloaks
First is that this takes time. You need to be patient and let your greenstuff cure long enough so you can handle and position it without destroying it.
Second is the thickness of your cloak. It needs to be thick enough to hold its shape. Not quite 2mm or so is good. 1mm is too thin for my tastes and 2mm is getting to be on the big size. A few test runs and you'll get an idea of how thick is good for what you want on your models. And the added thickness helps when it comes to adding the smaller folds in there... you have some greenstuff on the cape to work with.
Using some kind of oil or anything to keep the greenstuff from sticking is essential. Water might work, but it's worth it to use something that will really help you when it comes to sculpting. You can always wash the model off later on.
I've got some more work to do on mine to get them in tip top shape. I'm still fine tuning the process myself. In this post here, we look at sculpting fur pelts (large enough for cloaks).
Make sure to check out these posts as they might help:
How to sculpt a greenstuff half tabard
