
Making your own terminator combi-weapons shouldn't be tough. With a little bit of experimenting, I've come up with a way to create a combi-weapon that can be magnetized and looks very similar to the Forge World version.
How this conversion came about
I've always thought about using the storm bolters from vehicles for terminator weapons. They are slightly bigger and bulkier and it's what I thought a true storm bolter would look like. I just never did anything with the idea. When it came to combi-weapons on terminators, I always went with the over-under bolter weapons that power armoured marines use. They looked good enough for me.
Then comes along the Forge World terminator combi-weapons. After seeing those, I got the idea to use the vehicle storm bolter (or half of it) and combine that with a special weapon as the other half. In fact, that's almost what Forge World looks like they did... with a little more sculpting.
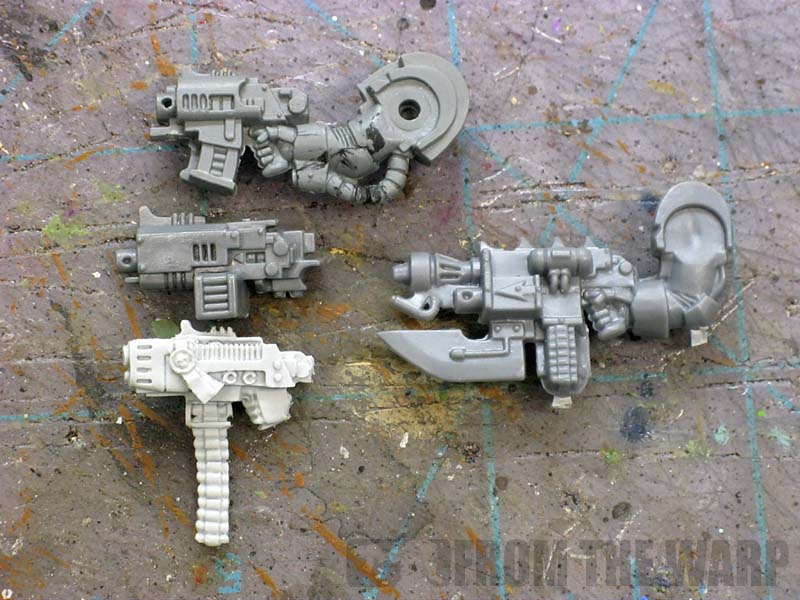
I decided to dig up a few versions of combi-weapons to see how my vehicle storm bolter conversion would compare in size before getting into this. Turns out, it's not too far off the mark. Seeing that the size would work, I decided to go all in and ordered three special weapons (meltagun, flamer and plasmagun) from Spikey Bits as I already had the storm bolter.
The process used in the conversion
I will say that this conversion is not terribly difficult, but you need to be precise with an X-Acto knife. I tried a number of things and decided to go this route for the ease (relative) of converting. There is no sculpting you need to do, there is no plasticard you need to add or anything like that. This is simply cutting away certain portions of the guns and marrying them together. But... the cutting away can be somewhat detailed. That's the one drawback. You need patience and a brand new X-Acto blade for this to work.
Alright, I lied a little bit. There is some greenstuff work and I did add some plasticard, but both of those steps are optional and I've outlined them below. You don't have to do them, but I did it so I could see how far I could take this conversion and make it believable.
I'm sure there are other ways to do this conversion with the same or similar bits. Like I said, I opted for this route since I didn't want to get into a ton of work, but still wanted something more than just an additional special weapon barrel glued in place on a normal storm bolter. I know the extra work sort of defeats the idea of making it an easy conversion with bits you have lying around, but it was the drive to come up with something that looked "right" to me that I ended up with this. All in all, it's an afternoon of work.
What you're going to need
A standard space marine vehicle storm bolter (just the left half)
Your special weapons (meltagun, flamer, plasmagun)
X-Acto blade
Magnets... that's right you can magnetize this conversion too!
Some greenstuff and plasticard (optional)
Getting the storm bolter ready
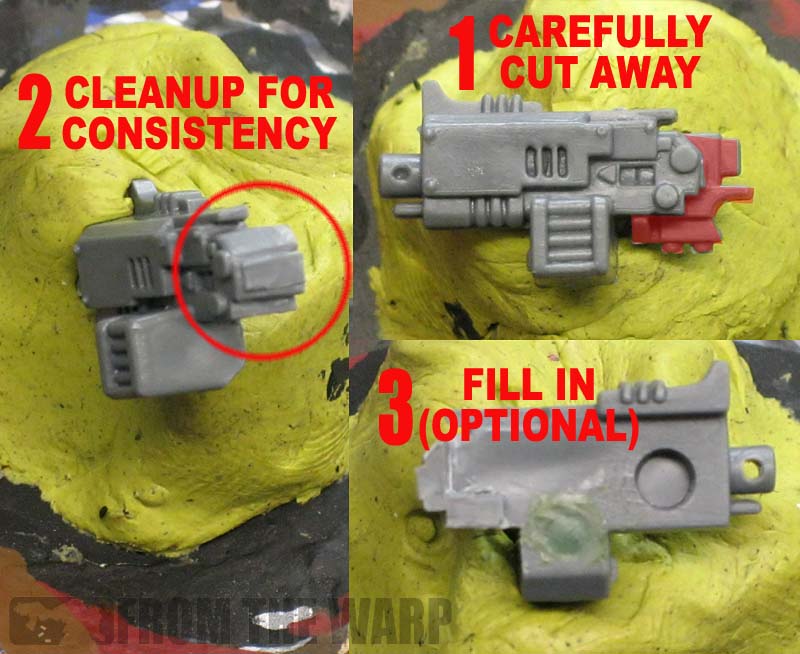
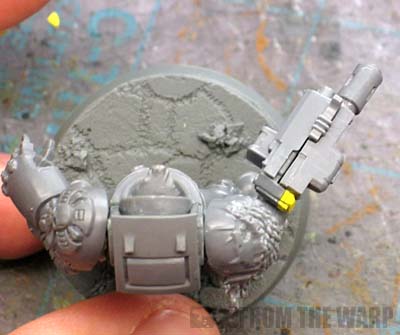
There is very little you have to do to this part of the gun. There are only a few areas you need to trim away (shaded red in the pic above) and this portion is all set. This part of the weapon also has the two optional parts to it. As far as greenstuff, you can fill in the hole that is on the underside of the weapon in the ammo drum. It's not in plain sight, but it can be seen since the special weapons do not cover it up. This is nothing more than pressing a bit of greenstuff into the opening and making it flush.

The other optional part is done with plasticard. Since the back of the weapon does not extend out very far, All I did was add a few pieces of plasticard to it and extend its shape outward. This is more of a visual thing and just finishes off the back of the gun. Again, not necessary, but a nice touch.
The picture above show an overhead view of what I mean. The storm bolter is there and the green section is where the special weapon is attached. We "add" the red portion so the back of the gun extends behind the special weapon making it look like part of the gun and not just "added on" at a later date.
Getting the special weapons ready
I'm going all out with this one and showing you what needs to be done to all three kinds of special weapons. Even though most folks will use just one, I'll be magnetizing these weapons and I wanted to go through the whole process for myself.
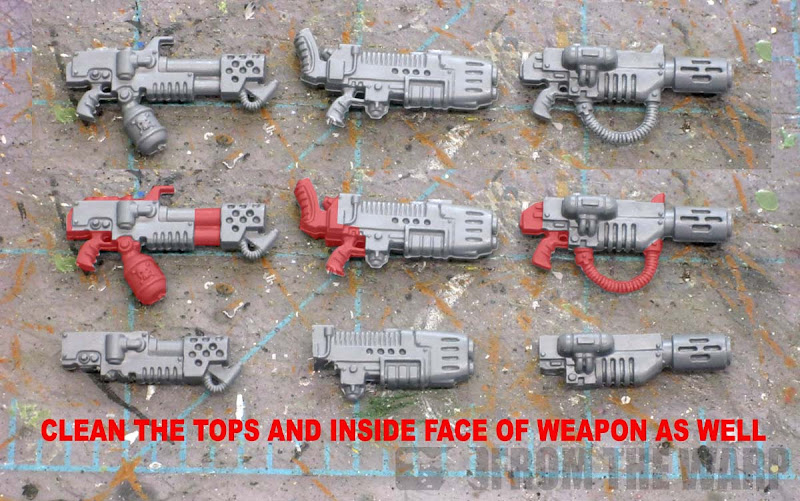
In the picture above, you can see the weapons before and then after the key portions were removed (the red shaded areas). The only thing not seen in the picture is the side of the special weapon that faces the storm bolter has been cleaned of any protrusions like rivets and details. That inside surface where it meets up with the storm bolter needs to be smooth so you get a nice, snug fit between the two halves.
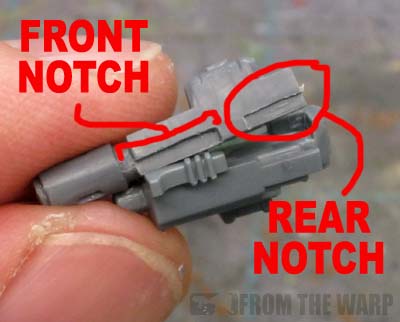
The front sight notch
The front sight on the storm bolter comes down slightly and you're going to need to notch out the top of each special weapon in order to get them to fit perfectly. This is not tough to do, it just takes patience and cutting away a little bit at a time.

The trick to getting the front sight notch cut into the special weapon is patience. When you set the special weapon into the storm bolter (match up the two halves), start from the back. Make sure the special weapon is seated all the way back as far as possible. This will make sure the back of the gun has no unsightly gaps once put back together. With the special weapon set in place, you should have a rough idea where the front sight notch needs to be cut out.
It takes three cuts to remove this section. Start by scoring your lines into your weapon. Don't try and make the full depth of the cut in one pass. It's far better to drag your knife over the cut 5 or 6 times until you have the correct depth. One slip and you may cut away too much plastic or worse yet, cut your finger!
Start with the first two cuts and once you have them in place,add the third cut along the side of the weapon. Fine tune your cuts by dry fitting the special weapon into the storm bolter. Once you have your front notch cut out the the right length and depth, the two halves should marry together nicely. If not, double check the inside face of your special weapon and make sure all the protrusions have been cleaned away.
Adding the optional rear notch
This part is optional and I've done it on my weapons as a visual thing. If you look at the back of the storm bolter, the middle of it has half of a notch in it. When the other half of the storm bolter was married up to it as intended, it made for some additional detail on the top of the weapon. By adding this notch to the back of our special weapon, we complete the illusion. For me, this is perhaps one of the biggest things you can do to make this conversion look convincing.
It's not required, but it goes a long way towards making this look like a legitimate weapon and not just two different guns glued together. The process for adding this extra detail is just like the front notch. Marry up the two halves and cut into the special weapon so it matches up with the back of the storm bolter.
A special note about the plasma gun option
Again, this is not necessary, but I'm including it here for the visual aspect. Just like we cut the rear notch into out other two special weapons, I wanted to do that to the plasmagun as well. This meant adding a layer of greenstuff on top of the plasmagun and cutting away what I didn't want.

You don't have to do this, but like the back notch on the other options, it goes a long way towards completing the illusion. And as a side note, you can see that our conversion is not too far off in size compared to the combi-plasma weapon from the Space Marine Terminator Librarian model.
You can also see what adding the little bit to the back of the weapon (the plasticard) does to make the weapon look like one solid gun instead of two halves from different guns.
And some final thoughts
Here's what the finished conversion looks like from a few different angles. I think this once comes pretty close to the Forge World style in looks. Add to that the ability to magnetize the special weapons and this one is a big win for me.


Make sure to check out these posts as they might help:
How to paint soot stained gun barrels
How to paint heat stained gun barrels
